How To
Installing an Oracle ODBC Driver can be confusing when referencing the Oracle website. The article aims to provide simple instructions on how to install the oracle driver.
Prerequisites
- Windows Platform
- Visual Studios Redistribute package - Oracle Instant Client 19 requires the Visual Studio 2017 redistributable. Oracle Instant Client 18 and 12.2 require the Visual Studio 2013 redistributable. Oracle Instant Client 12.1 requires the Visual Studio 2010 redistributable.
- Oracle Basic/Light Package, Oracle Install Client
- Local administrator access on the machine
Note: The current validated driver version on Alteryx is 12c, 12.01.00.01 (see here )
Procedure
- Download the appropriate Instant Client packages for your platform. All installations require either the Basic or the Basic Light package, and also the ODBC install package. Both packages should be downloaded for the version required (click here to download the package). Example below:
To install Oracle version 19 you need:
Basic package - instantclient-basic-windows.x64-19.6.0.0.0dbru.zip
ODBC Package - instantclient-odbc-windows.x64-19.6.0.0.0dbru.zip
Basic package - instantclient-basic-windows.x64-19.6.0.0.0dbru.zip
ODBC Package - instantclient-odbc-windows.x64-19.6.0.0.0dbru.zip
- Open the C:\ Drive and create a folder called Oracle. Unzip the basic package into the directory. For example: (
C:\oracle\instantclient_19_6) - Then unzip the ODBC package and copy the contents directly into the unzipped basic package folder. This essentially merges both packages into one instantclient_19_6 folder
- Add the location where the drivers are located to the
PATHenvironment variable.
How to update the environmental variable path (Please note: local administrator rights are required to access environmental variables)
- Open the Control Panel on the Windows machine, then select System
- Click on Advanced System Settings, then Environmental Variables
- Under System variables find the PATH, then click on Edit (Note: Use user variables for changes to a single user)
- Click on New and enter the variable path you unzipped the packages in step 2 (For example
C:\oracle\instantclient_19_6)
Note: If you have multiple versions of Oracle Client installed and want to use this driver as your default for other connections, make sure the new directory is moved above all other Oracle paths. You can use the Move Up/Down buttons to do this (see screenshot below)
- Download and install the correct Visual Studio Redistributable from Microsoft. Follow the standard installation process as prompted. (Click here to download). The installation will appear under the control panel once installed
- Open the ODBC Package folder again (example
C:\oracle\instantclient_19_6),Right-Click odbc_install.exe and Run as Administrator - It's recommended you restart the machine once the install is complete; however, the driver should already appear under the ODBC Data Sources Console.
Additional (Optional)Oracle Configuration for OCI
If you intend to co-locate Oracle configuration files, such as tnsnames.ora, with Instant Client, then create a subdirectory such as (
C:\oracle\instantclient_19_6\network\admin) folder and insert the files there. This is the default Oracle client configuration directory for applications linked with this Instant Client.If you wish to locate the configuration files in another accessible directory (for example, C:\OracleFiles), then set the system environment variable TNS_ADMIN field under System Variables to that directory location.
If TNS_ADMIN does not exist, create the system variable
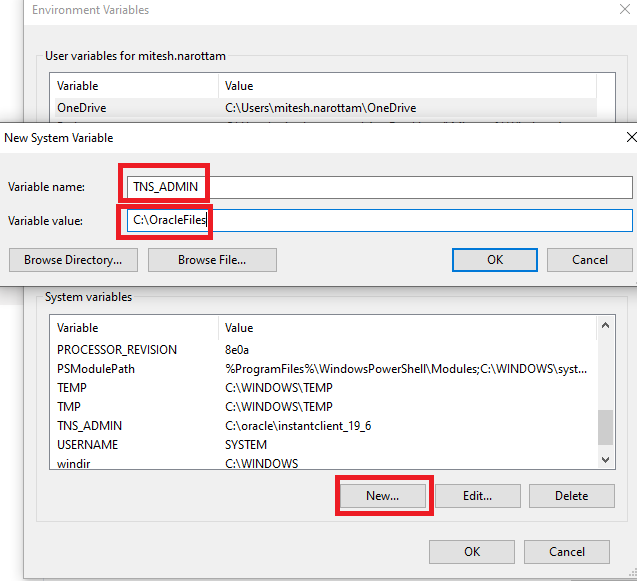
- Open the Control Panel on the windows machine, then select System
- Click on Advanced System Settings, then Environmental Variables
- Click New for the system variable
- Enter TNS_ADMIN under the variable name
- Enter the location of the file under variable value (example: C:\oracle\instantclient_19_6\network\admin)
Additional Information