The below is taken from the Tips & Tricks series presented at Inspire 2016. Special thanks to Margarita Wilshire and the Customer Support team for compiling these useful tips!
Resource Optimization
- Alteryx is designed to use all of the resources it possibly can. In order to make Alteryx run as fast as possible, it tries to balance the use of as much CPU, memory, and disk I/O as possible. The good news is that most of the resource utilization can be controlled. You can limit the amount of memory that is used on a system, user, or Workflow level.
- The Sort/Join memory setting is not a maximum memory usage setting; it’s more like a minimum. this allocated memory will be split between all the tools that sort in your workflow, but other tools will still use memory outside that sort/join block; some of them (e.g., drive times with a long maximum time) can use a lot.
- If a sort can be done entirely in memory, it will go faster than if we have to fall back to temp files, so that’s why it’s good to set this higher. But if the total memory usage on the system pushes it into virtual memory, you’ll be swapping data to disk in a much less optimal way, and performance will be much worse and that’s why setting it too high is a bigger concern.
- The global Default Dedicated Sort/Join Memory Usage at System level can be found at Alteryx > Options > Advanced Options > System Settings > Engine > Default sort/join memory usage (MB)
- To set a user-level default dedicated Sort/Join Memory Usage, go to Options > UserSettings > Edit User Settings > Defaults tab
Resource Optimization Best Practices
- Memory Settings
32-bit machines:
Setting should be on the lower, conservative side. No matter how much actual RAM there is, it only has a maximum of 1 GB available; as soon as it is set higher, the machine will cross over into virtual memory and be unable to recover.
A 32-bit machine should never have a setting over 1000MB, and 512 is a good setting. Set it low (128 MB), especially when using Adobe products simultaneously with Alteryx.
Important Message on Alteryx Analytics Support for 32-Bit Windows Systems
64-bit machines:
Set this in the system settings to half your physical memory divided by the number of simultaneous processes you expect to run. If you have 8 GB of RAM and run 2 processes at a time, your Sort/Join memory should be set to 2 GB. You might set it lower if you expect to be doing a lot of memory-intensive processes on the machine besides Alteryx. - Set your Dedicated Sort/Join Memory Usage lower or higher on a per-workflow basis depending on the use of your computer. If you're doing memory-intensive non-sort work (i.e., large drive times), then lower it; if you're doing memory-intensive sort work, then set it higher.
Configuration > Runtime tab > Dedicated Sort/Join Memory Usage > Use Specific Amount - Run Alteryx at a lower priority: This will ensure that the Alteryx Engine runs at a lower priority than all the other applications running on the same machine. Bydoing so, even the Alteryx GUI will remain responsive when you are running alarge Workflow in the background. This is an especially good idea for a shared server.
Alteryx > Options > Advanced Options > System Settings > Engine - Shared Servers: For a shared server, the system owner/IT person should set the memory to no more than (total memory - 2 GB)/(Number of Users). This way, if all the users are running Workflows at the same time, the system won’t go into virtual memory, which really slows things down.
- Web Servers: When running Alteryx on a web server, you really want to set the memory to the minimum possible without impacting the performance too much. We recommend trying a system memory setting of 64MB and then increasing the memory on a per Workflow basis as needed. It is important to note that the user setting for memory usually has no impact since the web service typically runs as a separate system user. Make sure to use the system settings.
- Background Processing: Any time you are planning to run a Workflow in the background while you are going to continue doing other work, it is a good idea to run it with less memory.
- It is also a good idea to have the temporary directory point to a separate physical hard drive from your boot drive. If your temp drive points to C:\temp and you runa Workflow that consumes hundreds of GB of Temp space (it happens), your system may become unstable.
Lean for Speed
Select Data to be processed only Select & Filter Tool
A best practice to optimize the performance of your workflows is to remove data that won’t be needed for downstream processing as quickly as possible; you can always bring later the additional data if needed. The Select tool removes fields or columns from your data. Other tools such as Join, Join Multiple, Spatial Match, FindNearest, and, to a certain degree, Transform tools and Reporting tools have some Select functionality.
Useful tips when using the Select Tool:
- Move highlighted field to top or bottom: Option > Move
- To reorder multiple fields at once: Select, right-click, and drag
- Changed your mind? To revert to incoming field order: Options > Sort
Another good way to optimize workflow performance is using the filter tool to remove unnecessary data. The Filter tool queries records in your file that meet specified criteria and identifies these records in your data, such as ZIP = 01001. You may choose to handle records that come from the True output differently than the False output by connecting additional tools to the workflow on either side. This will allow smaller amounts of data to be passed downstream.
Assign most efficient data types with theAutoField Tool
Optimize your workflow for speed by setting the field type to the smallest possible size and most efficient field type. String fields with a big size can be costly, and carrying that through your workflow will slow it down. Use the AutoField tool right after your Input Data tool to assign the most efficient type and size to your fields.
Below the data types before and after the AutoField tool.
Another benefit of using the AutoField tool is that it will reduce the size of your output file.
Speed up Processing
Disable All Browse tools
The Browse tool quickly becomes a data artisan’s best friend; it allows them to see/review the entire data at any given step in the workflow-building process. however, each of these browse tools creates a temporary yxdb and writing these files does take time and slow down the processing. When the workflow is ready for production, it is better to remove them; there is an option to just disable them so they can be easily enabled if needed. This setting can be found at Workflow > Runtime > Disable Browse Tools
Modify User Settings
In the User Settings > Advanced tab, there is information on how to improve performance.
1- Undo Levels. You can undo or CTRL+Z by default 25 times. In order to undo these many times, data needs to be stored in memory.
You can decrease the Undo Levels if you need to save memory and improve performance.
2- Disable Auto Configure. This option will stop the metadata from being loaded every time you add a new tool while developing a workflow; thus, press F5 to load the metadata only when needed.
3- Autosave interval in Minutes. By default, the designer saves a version of the workflow every 10 minutes. If for some reason you think you lost your work, there is this very handy option to save your skin. However, it can also make use of processing power when you do not expect it. You may want to increase the autosave interval and improve performance too.
4- Tool Results Settings. It is about that little anchor next to most tools that shows results just like a browse tool but with limited results.
In this setting you can limit the memory size reserved to display the results and save memory/performance. Add a browse tool when you really need to see all results.
Performance Profiling
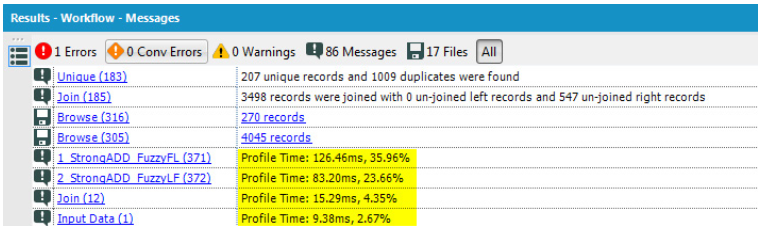
Have you ever wondered why exactly your workflow is taking so long? Is it the input or a join that seems to take forever? Performance profiling can answer those questions for you. It will tell you how long each tool took to process and how much of the overall processing time was allocated to that specific tool. Simply check the box in the Runtime tab under Workflow – Configuration and then analyze the Results - Workflow - Messages.